How to build a registration form using HTML and CSS in 3 simple steps


Introduction
A form serves to collect data from users. These data include Name, Email address, Phone number, etc. Like a coin, a form has two sides: the client side and the server side. Data is collected from the user via a form and sent to a back-end server, which then analyses the data.
In this article, we'll focus on the client-side of the registration form, using HTML (for layout) and CSS (for styling). This article focuses on the code syntax used to create a form and its outcome on your browser.
Prerequisites
Fundamental understanding of HTML and CSS
A code editor (preferably Visual studio code) to replicate code syntax
Step 1: Folder, Link, and Files
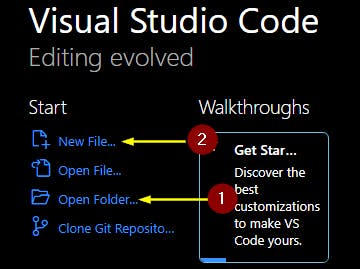
In this step, we'll create a folder, an HTML file, and a CSS file. We'll also link both files and finally, generate a boilerplate code syntax for a basic HTML page. Firstly, open your code editor, then follow the steps below:
Create a new folder and give it a name, for example,
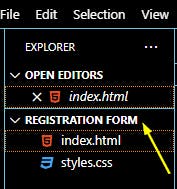
Registration formClick on the new file icon and add an
index.htmlfile and astyles.cssinRegistration formfolderPress the
Shift + 1 + Enterkey on the newly createdindex.htmlfile, to generate the boilerplate code you need for a basic HTML pageAdd a suitable title in your
<title>element, for example, "Registration form"Add
<link rel="stylesheet" href="styles.css" />in your<head>element, to link your CSS and HTML
PS: If you're using the visual studio code editor and have the HTML5 extension installed, then the shortcut on Number 3 can generate a boilerplate code. If you're using another code editor, you can write a simple HTML code structure.
<!DOCTYPE html>
<html lang="en">
  <head>
    <meta charset="UTF-8" />
    <meta http-equiv="X-UA-Compatible" content="IE=edge" />
    <meta name="viewport" content="width=device-width, initial-scale=1.0" />
    <title>Registration form</title>
    <link rel="stylesheet" href="styles.css" />
  </head>
  <body>
 </body>
</html>
Step 2: Add HTML (Layout)
Elements
To create a form:
The
<form>element is used, which nests several elements that collect user data, They include:Input element: The
<input>element can be displayed in many forms, depending on thevalueof thetypeattribute. It can either display as a text field, checkbox, dropdown menu, radio button or submit button.Label element: The
<label>element gives a title or caption to other form control elements such as: "input", "select", "textarea" etc. For example, a label like "First Name", "Email Address", "Select your Country" etc.Submit button: The
<button>element is necessary because every form must be submitted after the required text fields are filled.
Attributes
In the
<form>element, theactionand themethodattributes are used to direct collected user data to the server side of the formIn the
<input>element, thetype,id,name,placeholder, andrequiredattributes are used.In the
<label>element, theforattribute is used to bind the element and another form control element, for example: "input", "select" etc.In the
<button>element, atypeattribute is nested.
<form action="#" method="post">
<label for="fullname">Full Name</label>
        <input
          type="text"
          id="fullname"
          name="fname"
          placeholder="John Doe"
          required
        />
</form>

<!--The for and id attribute of the same field should always have the same value-->
Step 2 involves adding the appropriate elements and attributes in the <body> element.
Input
<form action="#" method="post"></form>in the<body>elementCreate a
<div>element with aclassattribute of "container"Add the
<h1>and<p>elements for the form name and small text underneath (optional)Add an
<hr />element to create a shift of topic which displays as a horizontal line breakAdd a
<label>element with thefor="fullname"attribute and a text ("Full Name") wrapped inside the<strong>element.Add an
<input>element underneath the<label>element with the attributes and corresponding values:type="text",id="fullname",name="fullname",placeholder="John Doe", andrequiredAdd the
<br />element, so every text field starts from a new lineRepeat Numbers 5 and 6 for email, password, and repeat password
Add an
<input>element with the type attribute set as checkbox and theirnameandidattributes set to "termsandcondition" and "terms"Add a
<button>element with atypeset as "submit" and "Register Now" as textCreate another
<div>element with aclassattribute of "container1"Input a
<p>element wrapping a text - "Already have an account? Sign in" inside the<div>container.
Code syntax:
<body>
    <form action="#" method="post">
      <div class="container">
        <h1>Registration form</h1>
        <p>Please fill in this form to create an account.</p>
        <hr />

        <label for="fullname"><strong>Full Name</strong></label>
        <input
          type="text"
          id="fullname"
          name="fullname"
          placeholder="John Doe"
          required
        />
        <br />
        <label for="email"><strong>Email</strong></label>
        <input
          type="email"
          id="email"
          name="email"
          placeholder="Enter Email"
          required
        />
        <br />
        <label for="pword"><strong>Password</strong></label>
        <input
          type="password"
          id="pword"
          name="pword"
          placeholder="Enter Password"
          required
        />
        <br />
        <label for="r-pword"><strong>Repeat Password</strong></label>
        <input
          type="password"
          id="r-pword"
          name="r-pword"
          placeholder="Repeat password"
          required
        />
        <br />
        <hr />
        <input type="checkbox" id="terms" name="termsandcondition" required />
        <label for="terms"
          >I accept <a href="#">Terms of Use</a>&<a href="#">Privacy Policy</a>.
        </label>
        <br />
        <button type="submit" class="regbutton">Register Now</button>
      </div>

      <div class="container1">
        <p>Already have an account? <a href="#">Sign in</a>.</p>
      </div>
    </form>
  </body>
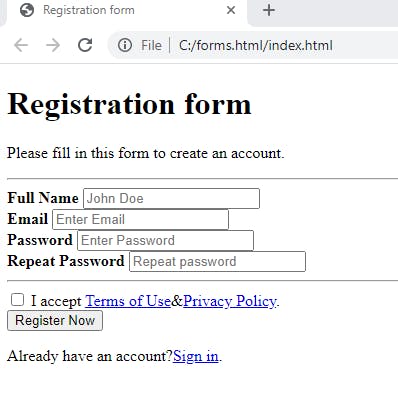
Code result:
Step 3: Add CSS (Styling)
In step 3, we'll style the structure of our registration form into something more appealing.
Style the universal selector
*with 0 as itspadding,margin, and,borderand style itsbox-sizingasborder-boxStyle the first
div containerthat nests the form elements with suitablepaddingandfont-familypropertiesStyle the
<h1>and the<p>elementStyle the
<input>elements (those with text field: full name, email, password) with awidthof 100%, this allows the text field to fill the entirety of the page. Addpadding,margin,background,displaystyling, etc.Style the
<hr />elements with the appropriatemarginandborderpropertiesStyle the element with a focus on the text field outline, background-color . This gives the text field a more appealing and refined look
Style the
<button>withmargin,padding,background-color,cursor,width,opacity, etc.Style the second
div containerwith appropriate CSS properties.
Code syntax:
* {
  box-sizing: border-box;
  padding: 0;
  margin: 0;
  border: 0;
}

.container {
  padding: 20px;
  font-family: "Trebuchet MS", "Lucida Sans Unicode", "Lucida Grande",
    "Lucida Sans", Arial, sans-serif;
}

h1 {
  text-align: center;
  padding-bottom: 10px;
}

p {
  text-align: center;
  padding-bottom: 7px;
}

input[type="text"],
input[type="password"],
input[type="email"] {
  width: 100%;
  padding: 15px;
  display: inline-block;
  background: #f1f1f1;
  margin: 5.5px 0 20px 0;
}

hr {
  border: 1px solid #f1f1f1;
  margin-bottom: 27px;
}

input[type="text"]:focus,
input[type="password"]:focus,
input[type="email"]:focus {
  background-color: #ddd;
  outline: none;
}

.regbutton {
  background-color: #021f14;
  color: white;
  padding: 16px 20px;
  margin: 7px 0;
  cursor: pointer;
  width: 100%;
  opacity: 1;
  text-align: center;
}

.regbutton: hover {
  opacity: 0.5;
}

a {
  color: rgb(13, 148, 125);
}

.container1 {
  background-color: #f1f1f1;
  text-align: center;
  font-family: "Trebuchet MS", "Lucida Sans Unicode", "Lucida Grande",
    "Lucida Sans", Arial, sans-serif;
}
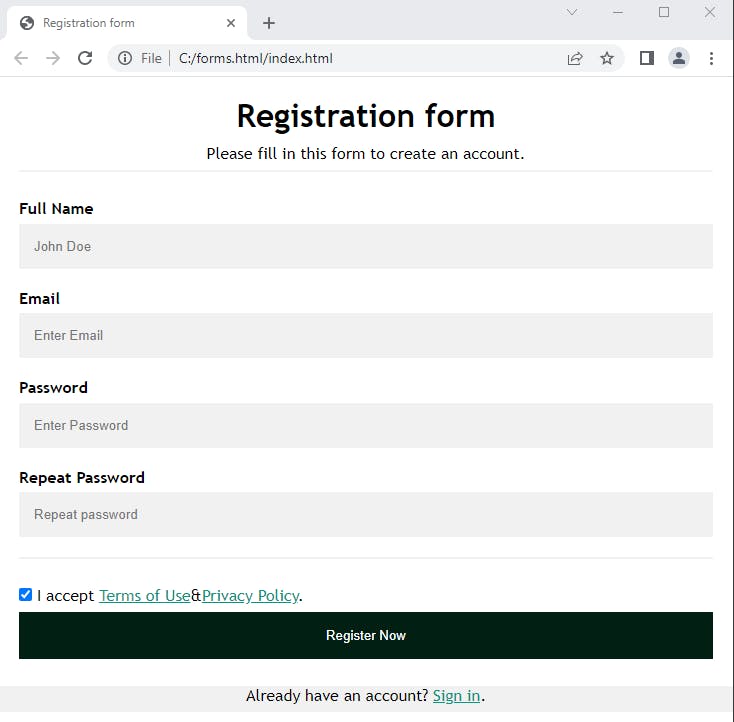
Code result:
Conclusion
In this article, We learned about a variety of form elements and attributes as well as how to use them to structure a form's layout and styling. With the use of HTML and CSS and the knowledge above, we built an account registration form. Awesome right?:)
If you'd like to read more beginner-friendly and easy-to-understand articles, follow me. For further questions, please drop a comment below or reach out to me via Twitter: @eseose_ani.